

Devices
Devices
Section titled “Devices”Nova PBX auto-provisions popular IP phone brands. Register a phone once by MAC address and the platform handles the rest: when the phone contacts the SIPSTACK provisioning server it receives a configuration file that sets its SIP account, extension, key layout, and phone features — no manual SIP credential entry required.
Navigate to Nova PBX → Devices → Devices. Viewing this page requires View Devices or Manage Devices (or View PBX settings / Manage PBX settings and devices); registering and editing phones requires Manage Devices or Manage PBX settings and devices.
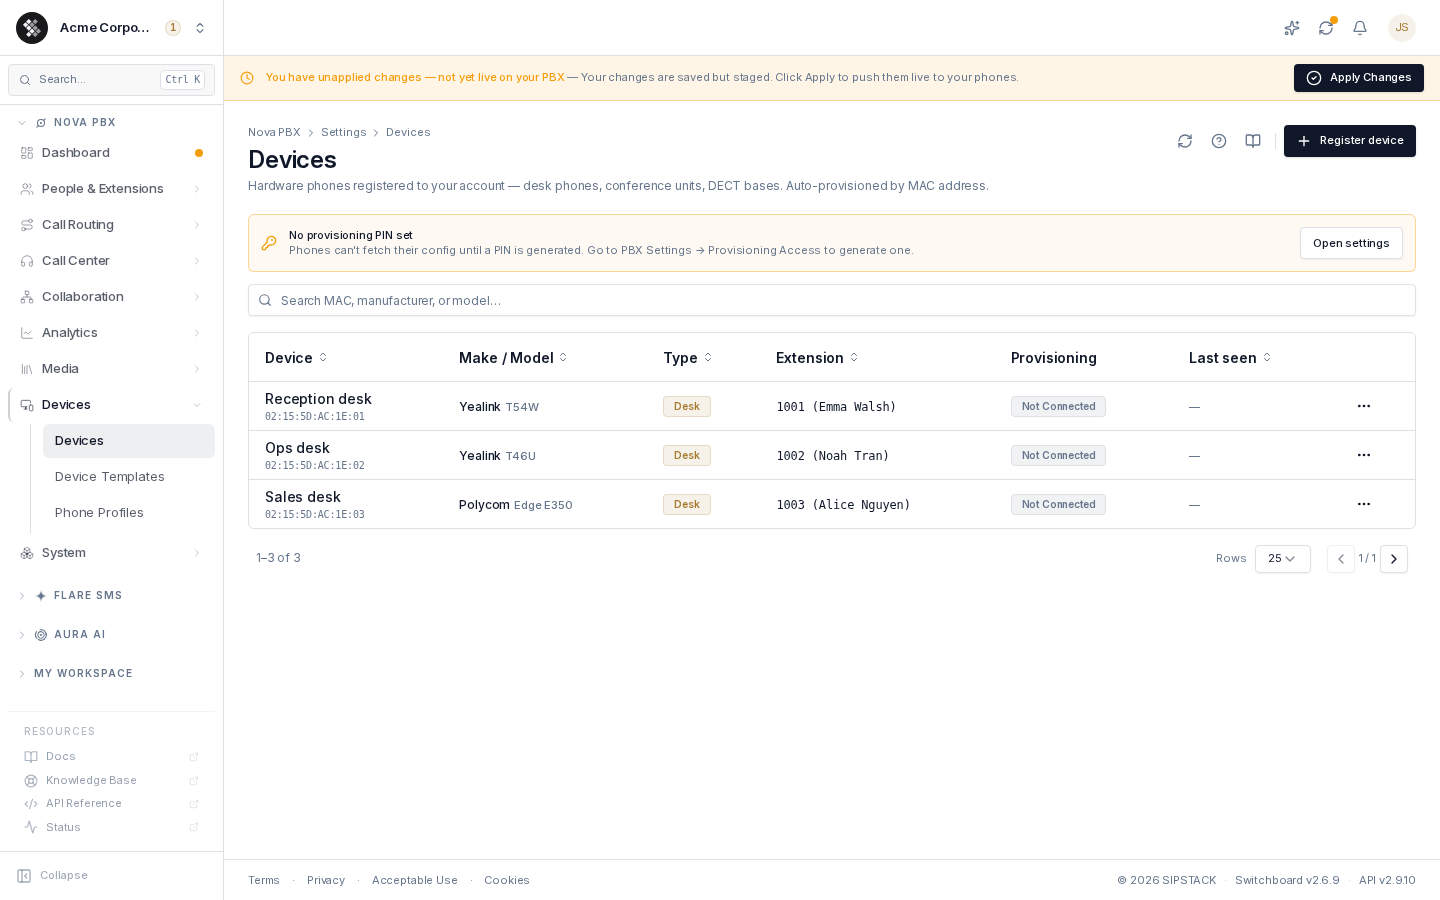
Supported brands and models
Section titled “Supported brands and models”The model catalog covers 60+ phones across three vendors. Picking a model unlocks the on-screen key-layout preview and accurate provisioning templates.
| Brand | Auto-provisioning | Models |
|---|---|---|
| Yealink | Full (SIP NOTIFY push) | T3x / T4x / T5x desk series, W5x / W7x DECT, CP conference, EXP50 expansion |
| Grandstream | Full (SIP NOTIFY push), plus an hourly check | GXP and GRP desk series, GBX20, DP DECT, GAC conference |
| Poly | Full (SIP NOTIFY push) | VVX series, Edge E series, CCX series |
| Other | Generic | Registers without catalog metadata; may need manual phone-side config |
SIPSTACK can keep phones on a firmware version you choose — see Firmware pinning. Without a pin, SIPSTACK leaves firmware alone: keep phones on the vendor’s recommended release yourself; each setup guide shows how.
How auto-provisioning works
Section titled “How auto-provisioning works”Your whole organization shares one provisioning URL and one provisioning PIN:
https://<slug>:<PIN>@cfg.sipstack.com/<slug>/<slug> is your tenant slug (also the HTTP Basic Auth username) and <PIN> is your provisioning PIN. Both live in Nova PBX → System → PBX Settings → Provisioning Access — not on this page. There are no per-device passwords: the provisioning server tells your phones apart by the MAC address you register here.
- Generate the PIN once in Provisioning Access and put the URL in DHCP option 160 on the network your phones use (steps per DHCP server). Phones that cannot use DHCP take the same values typed into their own provisioning settings — the register page shows the fields per manufacturer.
- You register the device in Switchboard (MAC address + brand, optionally model and a starting template).
- You assign an extension to line 1 and click Apply Changes. Applying publishes the device’s configuration file to the provisioning server — until you apply, the server has nothing to hand the phone.
- The phone boots, picks up the URL, authenticates with the slug and PIN, and downloads its configuration: SIP server, account credentials, extension number, key layout, and phone features (time zone, codecs, BLF keys).
Rotating the PIN keeps the old one valid for a 24-hour grace window — update DHCP option 160 at every site inside it.
Registering a device
Section titled “Registering a device”-
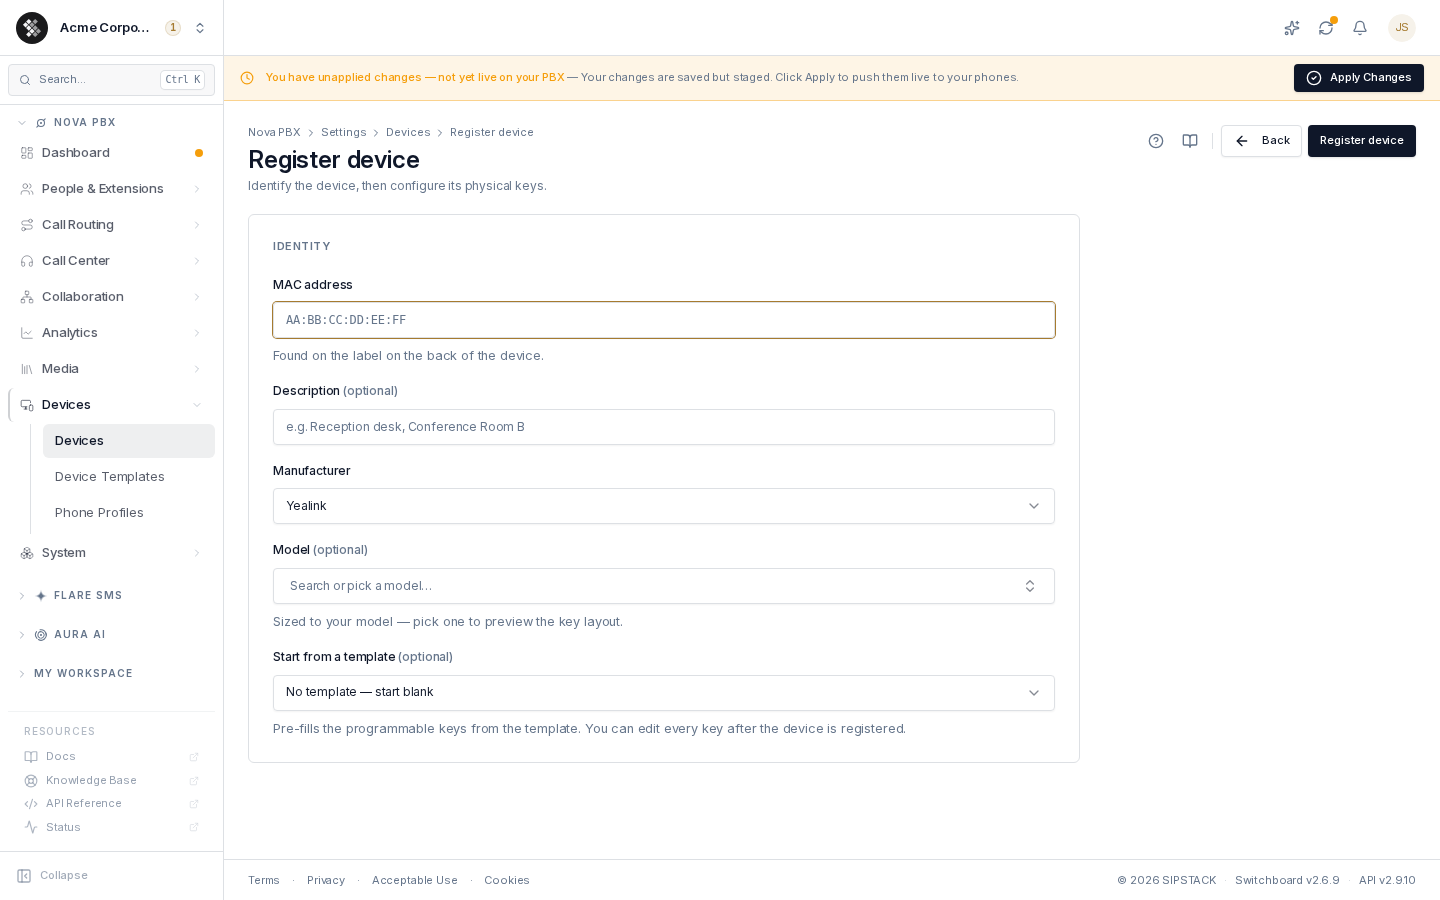
Navigate to Nova PBX → Devices → Devices and click Register device.
-
Enter the MAC address (format
AA:BB:CC:DD:EE:FF; the sticker is on the back of the phone). The manufacturer is auto-detected from the MAC prefix where possible. -
Pick the Manufacturer and (optionally) the Model — choosing a model shows a live preview of the phone’s physical key layout. For a DECT system, register the base station, never a handset.
-
Optionally add a Description (“Reception desk”) and pick a Device Template to pre-fill the programmable keys (see Device Templates).
-
Click Register device.
You land in the key editor: assign an extension to line 1, drag extensions onto BLF / speed-dial slots, and follow the on-screen setup steps for your manufacturer. Finally, click Apply Changes in the banner to push the staged configuration live.
Assigning extensions
Section titled “Assigning extensions”Extension assignment happens at the line level, in the device editor (device page → Open editor, or the Keys & Lines tab):
- Line 1 is the device’s primary extension — what it rings as and dials out from.
- Multi-line phones can carry additional extensions on lines 2+, or span one line across several physical keys (shared-line appearance).
- One extension can run on multiple devices simultaneously (desk phone + softphone); one device line carries exactly one extension.
DECT base stations use a Handsets tab instead — assign one extension per handset slot, then pair each handset to the base over the air. See DECT Cordless Phones.
Device detail
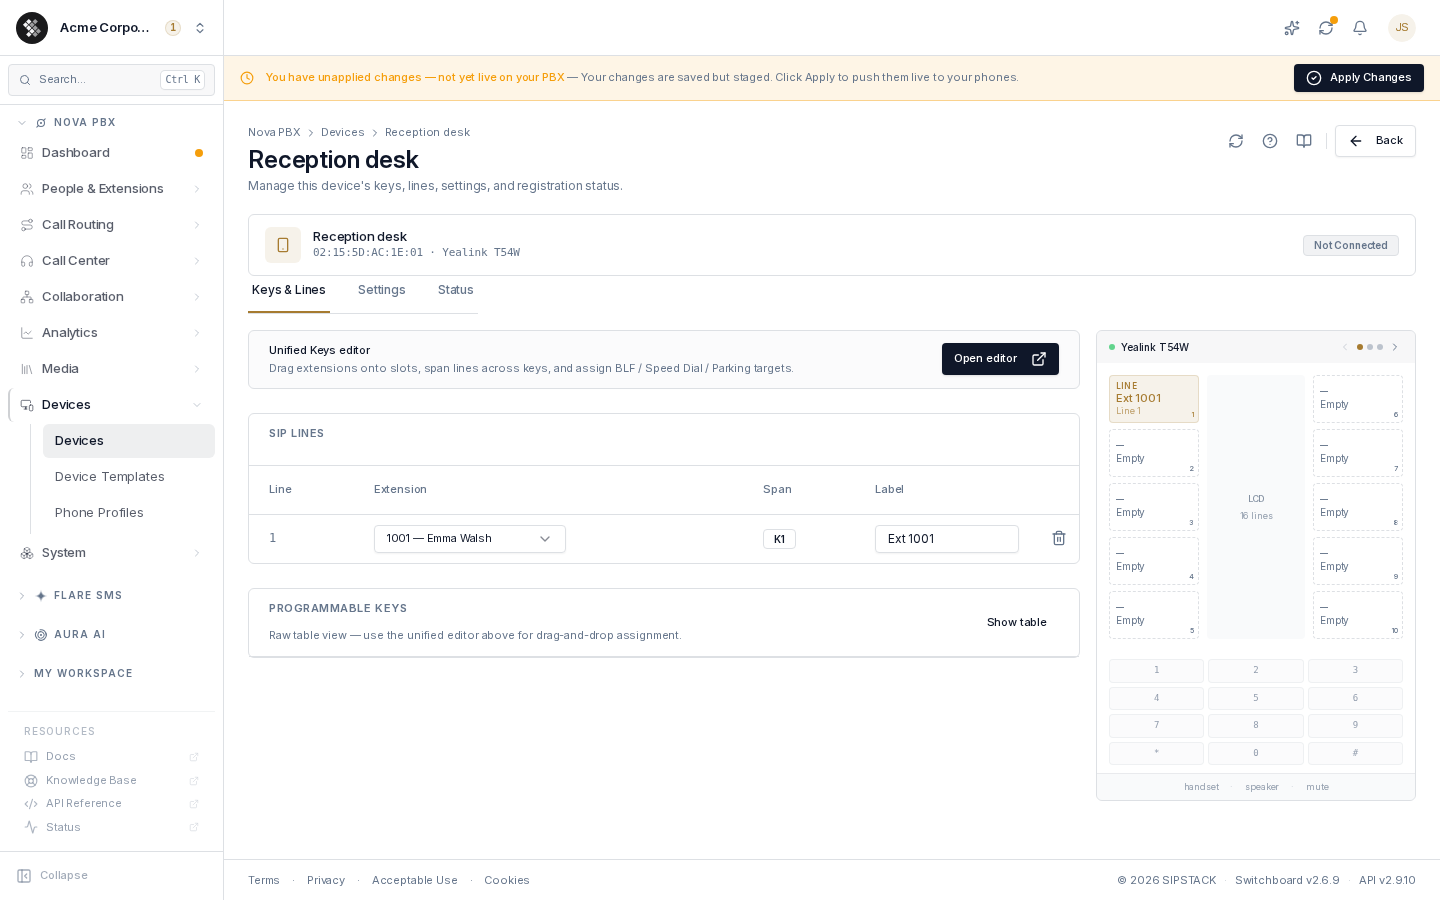
Section titled “Device detail”Click any row to open the device.
| Tab | What’s there |
|---|---|
| Keys & Lines | SIP line assignments, programmable-key table, live phone-layout preview, link to the drag-and-drop editor |
| Handsets (DECT only) | One slot per handset — assign or clear extensions |
| Settings | Per-device overrides: time zone, NTP, codec preset, admin password |
| Status | Provisioning state, last-provisioned time / IP, firmware, quick actions |
Quick actions (Status tab)
Section titled “Quick actions (Status tab)”- Reprovision — asks the phone to re-sync: it re-downloads its settings without a reboot. Use after changing keys or settings.
- Reboot phone — asks the phone to restart (briefly drops in-progress calls). Try Reprovision first.
- Preview config — renders the exact config file the phone will fetch, for troubleshooting. SIP and admin passwords are masked in the preview.
Reprovision and Reboot tell you what actually happened. A request that could not be delivered is never reported as sent:
| Result | Reprovision | Reboot phone |
|---|---|---|
| Sent | ”Re-sync request sent. If the phone is online it downloads its new settings within a minute; otherwise it updates at its next scheduled check-in." | "Reboot request sent. If the phone is online it restarts within a minute.” |
| Offline — the phone system is offline | ”The phone system is offline, so no request was sent. The phone updates at its next scheduled check-in.” | Same message. |
| Not ready — setup is incomplete | Assign an extension to the device (or one of its lines) and apply, or finish setting up the phone system first. | Same. |
| Not supported — this phone model has no remote re-sync or restart | ”This phone model can’t be re-synced remotely. It updates at its next scheduled check-in.” | Power-cycle the phone to restart it. |
| Failed — the request could not be sent | ”The re-sync request could not be sent. The phone updates at its next scheduled check-in; reboot it to update now." | "The reboot request could not be sent. Power-cycle the phone to restart it.” |
A phone that is not currently registered gets nothing to receive, so Reprovision reports it as not sent; it still updates at its next scheduled check-in.
If a phone’s provisioning credentials are the problem, the fix is organization-wide, not per device: rotate the PIN in Provisioning Access and update DHCP option 160.
Provisioning status
Section titled “Provisioning status”| Status | Meaning |
|---|---|
| Registered | Configuration published to the provisioning server for this device. |
| Pending | A push was attempted but has not succeeded — apply again to retry. |
| Not Connected | Never pushed: the device has no published configuration yet. |
A device with no extension on any line cannot be provisioned at all: nothing is ever published for it, so it sits at Not Connected indefinitely. Assign an extension to line 1 and apply.
Config history and rollback
Section titled “Config history and rollback”Every time a phone’s settings are published to the provisioning server, SIPSTACK keeps a copy. Open a device and go to Status → Config history to see when each version was published and whether it came from an Apply or an automatic retry. Click View on a version to see what changed from the one before it.
- Passwords are never kept. SIP passwords, admin and user passwords, and your provisioning PIN are removed before a version is saved.
- The newest 20 versions are kept per device. A publish that changes nothing does not add a version.
Roll back to this version restores that version’s device settings, lines, keys, template and firmware pin. Current SIP passwords are kept — a rollback never brings back an old password. The rollback is a change like any other: apply it, and the phone picks it up as usual.
Firmware pinning
Section titled “Firmware pinning”A pin keeps phones on a firmware version you choose from the SIPSTACK firmware catalog. Pin a version for a phone model in PBX Settings → Firmware by model (it applies to every phone of that model in your organization), or for one device in the Firmware card on the device page (Status tab). A device pin wins over the model pin.
- The phone checks for the pinned version when it next fetches its settings, and installs it if it is running a different version. Installing firmware restarts the phone, so set pins outside busy hours.
- Removing a pin does not change the phone’s firmware. It keeps what it has, and SIPSTACK stops asking it to check.
- A pin only applies to phones of the same brand as the firmware.
- Changing a pin counts as a change: apply it to send it to your phones.
Bulk import
Section titled “Bulk import”To register many phones at once, click Import devices on the Devices page and import a CSV file (Download template gives you the columns) with one phone per row and these columns:
| Column | Required | Example |
|---|---|---|
mac | Yes | 80:5E:C0:12:34:56 |
manufacturer | Yes | yealink, polycom or grandstream |
model | No | T54W |
extension | No | 221 — assigned to line 1 |
description | No | Reception desk |
template | No | name of a device template |
- Up to 500 rows per import.
- Validate first. Validate checks every row and reports any problem with it, such as a MAC that is already registered, without registering anything. Fix the file, then import.
- The import reports a result for each row, and the imported phones go out in one Apply at the end.
- You can turn on zero-touch provisioning for the imported phones in the same step.
Zero-touch provisioning
Section titled “Zero-touch provisioning”Zero-touch lets a phone set itself up straight out of the box, on any network, without DHCP option 160 or typing anything on the phone. SIPSTACK registers the phone’s MAC with the vendor’s redirect service (Yealink, Poly or Grandstream). When the phone first starts, it asks its vendor where to get its settings and is sent to SIPSTACK.
- Turn it on for one phone from the Zero-touch card on the device page (Status tab), or for many phones at once by importing them with Import devices and ticking Register with the vendor’s zero-touch service. Registering a phone in SIPSTACK does not turn zero-touch on by itself.
- Your provisioning PIN (optional). Enter it when you turn on zero-touch and the phone signs in to SIPSTACK without asking. The PIN is passed to the vendor and never stored by SIPSTACK. If you leave it out, the phone asks for its provisioning credentials on its screen the first time. After you rotate your PIN, re-enter it for phones registered with the old one.
- Deleting a device removes it from the vendor’s redirect service automatically, so the phone no longer gets sent to SIPSTACK.
- Each phone shows its zero-touch status. A registration that fails is retried automatically.
Replacing or re-provisioning a phone
Section titled “Replacing or re-provisioning a phone”- Replacing hardware: register the new MAC, assign the same extension to line 1, unplug the old phone and delete its entry. The new phone fetches the extension’s config on boot.
- Re-provisioning after factory reset: the device entry stays valid — the phone re-fetches its config on next boot as soon as it has the provisioning URL again (from DHCP option 160, or re-entered on the phone). Nothing needs to be reset in Switchboard.
Common questions
Section titled “Common questions”Phone says “registration failed” / “no service”. If you just changed the extension’s SIP password and the Apply warned that the phone did not get the re-sync request, reboot the phone. Otherwise the device likely hasn’t fetched its config. Check that (1) your organization’s PIN has been generated, (2) the phone has the provisioning URL (DHCP option 160 or the per-manufacturer fields on the register page), (3) the MAC matches what you registered, (4) line 1 has an extension assigned, and (5) you clicked Apply Changes after configuring. Step-by-step: A new phone won’t pull its configuration.
BLF keys or the voicemail light don’t update. BLF (busy lamp field) and voicemail message-waiting subscriptions require authentication: the phone must answer the challenge with the same SIP credentials it registers with. Phones provisioned by SIPSTACK already have them. On a third-party or manually configured phone, check that the SIP auth user and password are set on the account. SIPSTACK support can temporarily disable this check while you fix the phone.
Can phones show our shared phonebook? Not yet — see Phonebook.
“This MAC is already registered.” Each MAC is unique on the platform. If you bought a used phone, the previous owner’s registration may still exist — contact support to release it.
Can I register a softphone here? No — softphones (Pulse mobile/desktop) self-register through the user’s login. This page is for SIP hardware only; the two converge at the extension level.
Devices vs Extensions? Extensions are user-side (number, voicemail, forwarding rules). Devices are hardware-side (physical phones). See Extensions.